Christmas Ginger bread house
Christmas ought to be a busy time for a food blogger, make hay whilst the sun shines and all that. Instead I seem to have been busy on everything but Humble Crumble. Fortunately my good friend and work colleague Erin ‘the brainiest baker’ has come to the rescue with a festivetastic guest post (to be followed by one from me very soon, promise). Anyway, take it away Erin:
Growing up in a household where the food my mother made us was amazing, Christmas always stepped it up a notch. From my early teenage years onward, every year my mother and I would plan what would be made, and change our minds a million times about how things would be made ‘new’ among our traditional staples of Gravlax and usually a pork loin (as crazy as it might seem, we never had Christmas Ham, Turkey, nor fruit pudding!). It was during these teenage years that a tradition of my own was born – The Gingerbread House.
After making my first, I was hooked (one year I went a little crazy and did 12 houses!). Watching the detonation that brings me so much happiness. Inevitably people hover, taking ‘safe’ pieces from around the perimeter, maybe a little off the roof – no one ever wants to make the first destructive crack in the walls! But once it’s done, the decent into gingerbread rubble quickly follows!
I’ve never made the ‘same’ house twice; I always decorate ‘freestyle’ – working it out as I go based on what lollies I have chosen for the year (once you’ve made a house or two, you’ll never look at the confectionary aisle in the same way, all I see is the potential for little bits and pieces on and around the house!). Just like decorating a Christmas tree, there’s no ‘right’ or ‘wrong’ way to do it – some are elegant and perfect in their symmetry, some pick a single colour and go the minimal route others look a little like the whole box of decorations have been thrown at the tree – same goes for gingerbread houses.
For the uninitiated, here are my top tips:
- Baking is not a necessary ‘exacting’ science. If you don’t like something or can’t find it, swap it with something you prefer or can find. For this recipe, it mainly relates to the sugar, molasses and spices. These three things will change the flavour (and colour) – but I think it’s better to get a result you’re happy with. Can’t find molasses? That’s OK, replace it with treacle or golden syrup. Don’t like your gingerbread to be too… ginger-y? That’s ok, it’s not for everyone, reduce it a little and maybe think about upping the cinnamon.
- In the silly season, time is precious, but don’t think that means you can’t make a gingerbread house. It can really be made over a couple of days in stages. Make the dough one day, bake it another, construct it the next…
- Don’t be tempted to fully decorate the roof before construction, it’ll become too heavy and make sticking the house together difficult.
- If you find the idea of the full house too daunting, make a tent style house (2 triangles and 2 roof pieces) – just make sure the size of your ‘roof’ pieces matches the sides of your triangle.
This recipe makes enough for a house and some extra little cookies.
Gingerbread
- 800g plain flour (plus extra for dusting and rolling)
- 1 teaspoon baking powder
- 250 g unsalted butter – room temperature
- 1 cup dark brown sugar (firmly packed, which is 200g)
- 3 teaspoons ground cinnamon
- 3 teaspoons ground ginger
- 1 teaspoons ground cloves
- 1⁄2 tsp nutmeg
- 1 tablespoon cocoa powder
- 1/2 teaspoon salt
- 2 eggs
- 1 cup molasses
Royal Icing
- 2 egg whites
- 450g icing sugar (you might not need all of it), well sifted
- 1 teaspoon vanilla essence
Decorations
Anything you like! From all the regular jubes and gummy lollies, through to biscuits, cookies, wafers, chocolates and whatever takes your fancy.
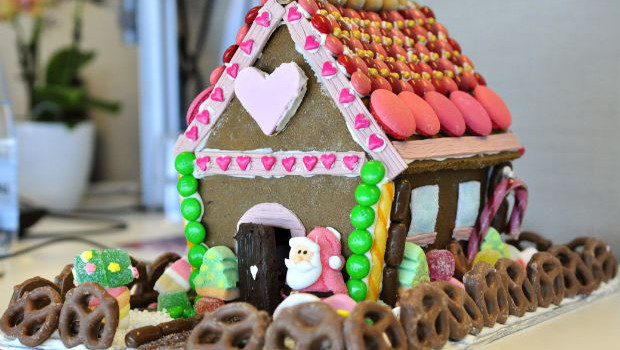
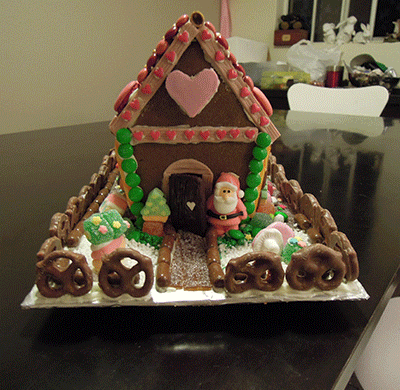
On this house I have m&m’s, macaron shells, wafer sticks, bullets, oversized sprinkles, nerds, candy canes, various lollies (including a little marshmallow santa), chocolate pretzels for the fence and sago for the snow.
As a little extra, I like filling the inside of the house with lollies too – kind of like a Piñata-house!
Equipment
- Rolling pin
- Cookie cutters (if you’re making extra cookies)
- Thick cardboard / cake board to put the house on
- Serrated knife
- House template
Non-essential equipment (these things make it easier, but they’re not required)
- Stand mixer / electric beaters
- Piping bag
- Make your Gingerbread dough… Either by hand or in the bowl of an electric mixer fitted with the whisk attachment; cream together butter and brown sugar on medium speed.
- Add spices and cocoa and mix lightly (a quick mix with a spoon will do). Add the molasses and mix briefly. Add eggs (one at a time) and mix until the mix is well incorporated – it will be like a thick sludge at this stage.
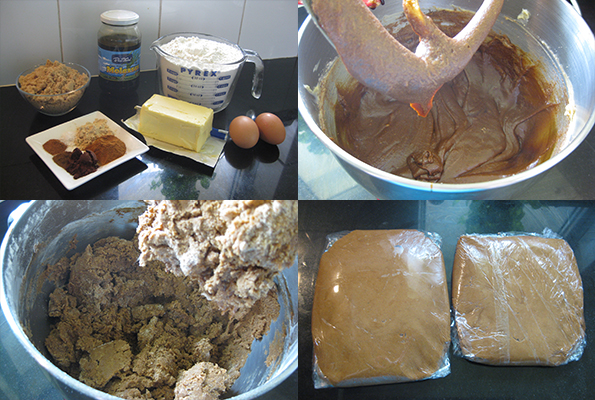
Gingerbread house dough in 4 simple steps
- Sift together flour, salt and baking powder and add to bowl; mix until just combined. If you’re using a mixer, only whiz it quickly in the mixer, and use your hands to create the dough – it will be a really soft dough.
- Bring dough together and shape into two flattened discs. Lightly dust with some flour then wrap in plastic and pop in the fridge for half an hour to an hour (or if you’re going in stages, you can leave the dough until you’re ready to roll [ha!]).
- Take one of your dough portions out of the fridge and let it defrost a bit (if it’s a super hot day, you won’t need to wait) – but in any case, 10 minutes is enough – the reason I make two portions of dough is to try to keep it as cool as possible while working with it. Dust your bench and rolling pin really well with flour then roll out dough to about 1cm thick. Transfer your dough onto baking paper then continue rolling to get it between 5 and 7mm thick (Since the dough is soft, you don’t want to try and move the cut piece too much, it’s easier to use the paper to carry it). Dust the dough lightly before putting your template pieces in place and cut one piece at a time.
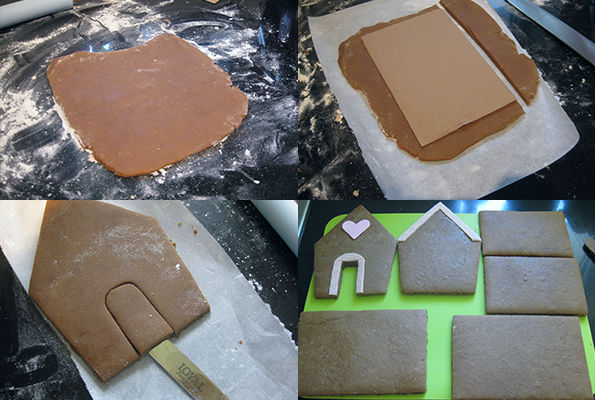
Roll out the gingerbread dough and cut as per template
- Put your cut pieces onto a flat surface in the freezer while you roll and cut the rest of your pieces – give them some time to firm up – 15 minutes or so while the oven heats up to 180°C. Line two large baking sheets with paper.
- Once you’re done cutting out the house pieces, use the rest of the dough to cut out small shapes (hearts, stars, circles, Christmas trees etc.) – these can be used to decorate the house or the surrounds. Place pieces on baking sheets lined with baking paper.
- Bake gingerbread in batches until lightly golden; 12 to 14 minutes each (when making the smaller cookies [if you do] cut back the baking time to about 7 or 8 minutes for smaller shapes).
- This step is not essential, but the straight edge helps make it easy to construct your house. While the cooked gingerbread is still warm, place your template pieces back over the cooked gingerbread and neaten up the edges that have spread a little during cooking. Cool on the baking sheet slightly before cooling completely on wire racks. [if you’re stopping at this step, keep your house pieces in an airtight container until you’re ready for construction.]
- Make your royal icing by whisking egg whites by hand or in an electric mixer until foamy.
- Add icing sugar, in approx. 1⁄2 cup quantities and mix until combined. Keep going until you have a thick icing – add your vanilla. The thickness of your icing impacts how your house sticks together and how quickly it sets. You’re looking for quite a thick mixture – if you tip your bowl, it shouldn’t move too freely – if you’ve added too much icing sugar, you can thin it with a dash of water.
- Once I’m done making my icing, I put it straight in an air tight container and use it in stages.
- Put royal icing in a piping bag with a plain 1cm nozzle – or no nozzle.
Start constructing your house…
- Decide where you’d like to position your house on the board. I like to set my house back a bit so there’s space for a little front entrance, but it’s up to you.
- Starting with the front of the house, pipe (or spread) a (generous) line of icing on the base of the piece. Stick it to your board then use some glasses or bowls to hold the piece upright while you get your sides done. While the icing is wet, there’s room to move the pieces, but you don’t want to move them too much or you’ll have no adhesion left – I use the template pieces to guide the length of the walls then pipe a line in place so you know what you’re trying to get alignment with.
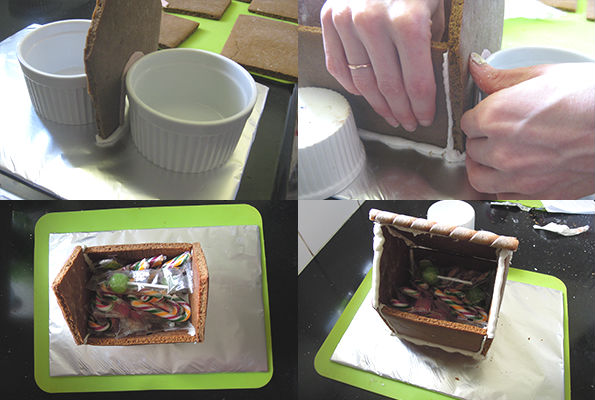
House building
- Pipe down the back of your front pieces (where the walls will meet) then along the bottom sides of your walls and put them in place. Push them together in the corners so they’re nice and snugly together. Finish the foundation of your house with the back wall, then add your front door – I like to keep my front door ajar, I think it looks cute and inviting! You might need to move the pieces a bit to make the edges all meet up neatly. Let the foundations set (if you need to, surround your house with some glasses / bowls / canned foot to prop up the walls while the icing sets – about 15 mins).
- At this stage you can begin to decorate your sides, front and back walls and surrounds of your house – go crazy. Use dabs of royal icing or melted chocolate (if you like) to attach your decorations. To make a garden, spread a thin layer of icing over the board base and cover with whatever you’d like the garden to be made of – sprinkles or jelly crystals for grass, sago (like the pictured one) or coconut for snow, crumbled oreos make great ‘dirt’ or you can leave it plain!
- Line the top edges of your house with icing ready to attach your roof — the middle of the roof might not completely join neatly, that’s OK, just decorate to cover up! When you’ve added your roof, you might like to prop it in place using a mug (or something similar at the right height) while it dries.
- Finish decorating your house, roof and garden and you’re done!
About the Author
Gareth Englishman in Sydney loves a whisky, pies and all things savoury. Digital Marketer by day, cook the rest of the time. Amateur writer, photographer & aspiring anthropologists.
Related Posts
Pfeffernüsse – German Christmas cookies →
Almond nougat – turron →

Brined Turkey →
Pingback: Gluten & dairy free birthday cake | Humble Crumble